Did you know that scarecrows have been around for over 3000 years? The Egyptians were the first to use Scarecrows along the Nile River to protect wheat fields from flocks of quail (see link to a great source The History of Scarecrows). The Greeks, Romans and Japanese all had a form of scarecrows. I think the scariest story was from medieval Britain who use living Scarecrows!!! 9-year old boys and older patrolled wheat fields carrying bags of stones to pelt the crows if they landed in the fields.
I hope you find my interpretation a lot friendlier!
To get started I needed to make an armature, now forgive me here because I was doing it all in a rush and didn't remember photographs until it was made ready to StoneArt. I will try to explain...
First I used a wooden base and some 2mm aluminium wire. I pulled off around about a meter and starting from the centre I made a circle for the head by wrapping the wire around a jam jar. I extended out each side to made shoulders and arms and then wrapped the tail of each around the pole on the wooden stand.
Once this was done I used masking tape to secure it in place and padded out the body, arms and head with a lot of cheap kitchen foil. I then masked the whole thing with masking tape.
I then made up a quantity of StoneArt Clay - around 150ml of Ivory Powertex - once this was made I painted Powertex onto the masking tape to give the StoneArt clay something to key onto and then added pieces of clay that I had flatted between my fingers. Once it was covered I used the end of a paintbrush to mark out eyes, mouth and nostrils. I then painted a thin layer of Powertex over the clay and gently rubbed in more dry StoneArt Powder. I left this quite rough as I wanted a rough weather work finish. I then set aside to dry.
Now it was time to dress the Scarecrow. I used Transparent Powertex which I worked into some ivory paperdec to cover the the arms and head to give the impression of being stuffed with straw. Next I used two similar sized pieces of natural paperdec and worked transparent Powertex in. Tip: it uses a lot more than you think but once dried it is clear and hard. I draped them over the shoulders and about two thirds of the way down on both front and back.
I used additional pieces to cover the wooden pole and base to give the effect of a tree trunk. I also covered a little mdf mouse that was left over from another Powertex MDF kit. Finally I added some more ivory paperdec to make a scarf. I then left it to fully dry, it took about 3 days!
Now to add colour! I could fill the whole blog with the very many colours and layers I added. However I wont but I will say that i started with Powercolor ultramarine blue and a tiny spec of black pigment mixed with Easy Varnish. to colour the blanket coat. I used dark green for the base, orange and red for the scarf. For the straw, I used yellow and red ochre in varying degrees and used red ochre on the mouse. I then built more layers of colours to get a well weathered look on his coat using Colortricx in pearl and copper. I coloured the tree trunk with Secret Artloft Pigment in Golden Olive.
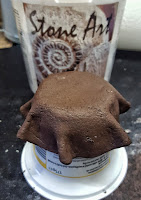
I then made up a small quantity of StoneArt Clay using Bronze Powertex Fabric hardener. I used a golf ball sized ball of the clay and pressed onto the top of the Scarecrows head
I rolled this with a craft rolling pin and shaped into a circle and draped over a yogurt pot to shape
Then I layed it over the powertex ball on the head and finished the shaping. I also pressed a little butterfly into the hat that was left over from some other project.
I added two mdf ravens which i painted with Powercolor Black mixed with Easy Varnish. Once they were dry I used Secret Art Loft Pigments in Interference Lilac to add some shimmer and Tequila Sunrise to colour the beak. I stuck these on using some matte gel for speed and added some tiny rhinestones for the eyes on the mouse and ravens.
Hope you like my rather friendly but scruffy weathered Scarecrow!
Have a fabulous autumn and don't forget to share your makes with us over in The Powertex Studio and Powertex Addicts United.


