Monday, 12 November 2018

Northern Lights

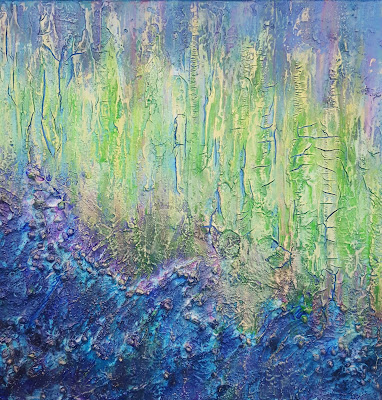
Well here we are Autumn is almost over the dark nights are with us.  I love crisp cold dark nights when I can see lots of stars twinkling in the sky after the stunning colours of the setting sun.  Here in the UK there a only a handful of places where, if the conditions are right you might spot the Northern Lights. Going to Norway or Iceland to see the Northern Lights is high on my bucket list but until then, I have created my own abstract Powertex painting to stir or feed that dream!


So grab a coffee and relax while I take you through some very simple steps to create your own version.

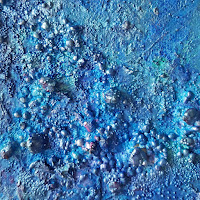
First I took a canvas that had been part used on a demonstration and it already had some texture at the bottom.  I had created the texture using a mix of Easy Structure and Powertex sand balls which I put down on a white 30x30 cm canvas.  
I then made up some Easy 3D Flex with some white powertex and using a metal artist pallet knife I spread the 3D Flex mixture vertically on my canvas. As the base texture was already dry, I painted over a good coat of White Powertex.
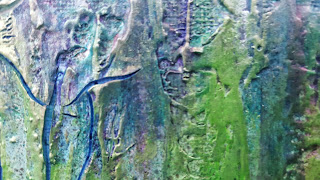
Next I mixed up some blue bister granules using a teaspoon of granules to 30 mls of warm water from the kettle with 30mls of white vinegar.  This gives a crisper look when sprayed on your canvas as can be seen in the image below.  I also sprayed some standard black bister at the top area of the sky section

To give more depth I sprinkled some blue bister granules onto the area representing water and rocks and sprayed this with water.  
I then left the whole thing to dry and crack over two or three days.
Once it was dry I washed back the black area of bister using a damp sponge. I then used a mix of the Aqua blue and Deep Sea Secret Art Loft acrylic inks to create the dark water and sky. I then used Secret Art Loft acrylic paints in Key Lime, Blueberry Pie and Plumb Pudding on a very dry brush to create the colours synonymous with the Northern Lights.
I then added some metallic highlights using Golden Metallic and Viola Metallic inks as well as Green Ginger, Limoncello Gold and Colortricx Pearl pigments mixed with Powertex Easy Varnish.
I can't tell you exactly how I added the pigments and colours as I use loads and loads of very light layers, just experiement and have fun!
Here is the finished piece

See you in December where I have created a Powertex Christmas Ornament!

Bye for now
Fi

Ps..you can view a video close up of my colour blending here


Friday, 12 October 2018

Halloween Nightmare or How not to make a craft video!

I bet I am one of the few people who have a dread of Halloween. It's not that it scares me or that I don't like the art of it all, it's just that for some reason every time I try to create what's in my head, it turns into a Halloween Nightmare!!! 

I had this grand idea that I would use Powertex and some of the super Secret Art Loft bright acrylics and the Gothic Arches.
It has all worked out just fine except I had it all planned in my head that I would create my very first Craft Video!

As you may know that as well as being on the Powertex DT I am also a Resident Tutor on the Mixed Up Creative education platform, so in my infinite wisdom and being filled with oodles of enthusiasm I got myself all set up to create the video for them.  Bearing in mind I also have lots of experience demo'ing on TV craft channels this should all be so easy...well believe me it isn't!  
In a TV studio there is a crew, superb lighting and a presenter who asks the questions viewers want answers too; you have your step pieces prepared and you have everything laid out ready to head in the order you want to use them. Oh and with filming, all you have to think about is product placement and which camera to look at.
Hmmm this is where it all goes belly up!  I didn't have steps planned this was going to be a one shot product.  I had just one small light; I had to operate the camera in my very small studio - just 3 meters by 1.5 meters but every mm is packed tight rather tardis like!
I had it all planned though so it would run like clock work.  
I made sure my long suffering other half knew what I was doing and he was primed to stay well away.
OMG it was a total nightmare!!!  
Not at all the slick professional looking video I had imagined, planned for and not at all fun! It was my Halloween Nightmare and then some!  Dropping various bits, forgetting I had wrecked the first arch and the second had sticky tape on etc. etc.  Worse still is that that what you don't see or hear at the end of the video is my husband walking in on me, talking loudly about tea, apologising profusely, then me slinging the paintbrush and who knows what else across the worktop and sighing so loud I have every expectation even a Ghost would have shrieked in fright!
After all that I decided while it was a rubbish video I would share my experience with you because at the end of the day we all have to start somewhere.  Hat's off to all those highly polished artists and crafters who have mastered the intricacies of video, I am learning, I will not be defeated and I will master it.  
In the meantime have a laugh with me, share my pain and I hope the resulting Powertex Halloween tag is slightly OK.

Bye for now, Fi xx
ps Here's the link to the video


Friday, 31 August 2018

Scarecrows in September

Wow, it's September already! I love September the start of autumn and all those fabulously rich warm colours.  As a farmers daughter the harvest was always such a special time, I loved helping dad bring in the harvest and the whole countryside appeared to turn rich rusty gold, nippy nights, mellow warm days...oh and scarecrow trails!

Did you know that scarecrows have been around for over 3000 years? The Egyptians were the first to use Scarecrows along the Nile River to protect wheat fields from flocks of quail (see link to a great source The  History of Scarecrows). The Greeks, Romans and Japanese all had a form of scarecrows.  I think the scariest story was from medieval Britain who use living Scarecrows!!! 9-year old boys and older patrolled wheat fields carrying bags of stones to pelt the crows if they landed in the fields.  

I hope you find my interpretation a lot friendlier!


To get started I needed to make an armature, now forgive me here because I was doing it all in a rush and didn't remember photographs until it was made ready to StoneArt.  I will try to explain...  

First I used a wooden base and some 2mm aluminium wire.  I pulled off around about a meter and starting from the centre I made a circle for the head by wrapping the wire around a jam jar. I extended out each side to made shoulders and arms and then wrapped the tail of each around the pole on the wooden stand.  
Once this was done I used masking tape to secure it in place and padded out the body, arms and head with a lot of cheap kitchen foil.  I then masked the whole thing with masking tape.
I then made up a quantity of StoneArt Clay - around 150ml of Ivory Powertex - once this was made I painted Powertex onto the masking tape to give the StoneArt clay something to key onto and then added pieces of clay that I had flatted between my fingers.  Once it was covered I used the end of a paintbrush to mark out eyes, mouth and nostrils.  I then painted a thin layer of Powertex over the clay and gently rubbed in more dry StoneArt Powder.  I left this quite rough as I wanted a rough weather work finish. I then set aside to dry.
Now it was time to dress the Scarecrow.  I used Transparent Powertex which I worked into some ivory paperdec to cover the the arms and head to give the impression of being stuffed with straw.   Next I used two similar sized pieces of natural paperdec and worked transparent Powertex in. Tip: it uses a lot more than you think but once dried it is clear and hard.  I draped them over the shoulders and about two thirds of the way down on both front and back.
I used additional pieces to cover the wooden pole and base to give the effect of a tree trunk.  I also covered a little mdf mouse that was left over from another Powertex MDF kit. Finally I added some more ivory paperdec to make a scarf.  I then left it to fully dry, it took about 3 days!
Now to add colour! I could fill the whole blog with the very many colours and layers I added. However I wont but I will say that i started with Powercolor ultramarine blue and a tiny spec of black pigment mixed with Easy Varnish.  to colour the blanket coat.  I used dark green for the base, orange and red for the scarf.  For the straw, I used yellow and red ochre in varying degrees and used red ochre on the mouse.  I then built more layers of colours to get a well weathered look on his coat using Colortricx in pearl and copper.  I coloured the tree trunk with Secret Artloft Pigment in Golden Olive.
I then made up a small quantity of StoneArt Clay using Bronze Powertex Fabric hardener. I used a golf ball sized ball of the clay and pressed onto the top of the Scarecrows head

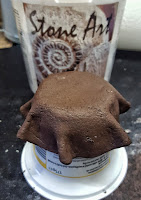
 I rolled this with a craft rolling pin and shaped into a circle and draped over a yogurt pot to shape
Then I layed it over the powertex ball on the head and finished the shaping.  I also pressed a little butterfly into the hat that was left over from some other project.

I added two mdf ravens which i painted with Powercolor Black mixed with Easy Varnish. Once they were dry I used Secret Art Loft Pigments in Interference Lilac to add some shimmer and Tequila Sunrise to colour the beak. I stuck these on using some matte gel for speed and added some tiny rhinestones for the eyes on the mouse and ravens.


Hope you like my rather friendly but scruffy weathered Scarecrow! 
Have a fabulous autumn and don't forget to share your makes with us over in The Powertex Studio and Powertex Addicts United.


Being a Powertex Tutor

Hi everyone hope you are having a fabuously creative summer!  I have and I'm so inspired I have lots of ideas that I will be working on as we move into autumn.  

I've had a few times this summer when I have looked back at my journey with Powertex and how it really has enhanced my life in so many ways. I have met so many talented artists and crafters in workshops I have led, through magazine articles I have written, at the NEC, Hochanda and best of all at the training and tutor retreats.  As a tutor we are so well supported and encouraged to progress on our own journey,

The highlight of the year so far for me was the annual Tutor Retreat which is held at Powertex HQ. I love every second there and these first two images are from the first day which was led by the superbly talented Rosie Casselden.  This was right out of my comfort zone because I cannot draw to save my life! However Rosie made it so easy breaking it down in to a series of flowing shapes, then textures and colours that I was completely lost in the whole project.


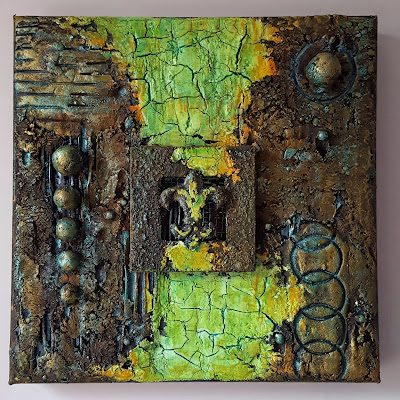
On day 2 we enjoyed a fabulous day with our leader and Powertex UK guru Tracey Evans.  I love abstract art and deep interesting textures so this was right up my alley as they say. These are a close up and a full shot of my finished project. Again I was lost in building the colours and levels and both paintings are on my walls at home.


We were joined at the Retreat by international artist Abyssimo (Maria Grausbaum-Fondler) who many of us follow and admire for her love of colour, texture and sparkle.  She is the most beautiful generous soul and having the opportunity to get to spend time with Maria who I am so happy to call my friend was amazing.  
To top the Retreat off perfectly Maria led a full workshop on day 3 when members of the public were also able to join us.  Maria led a class with paints as vibrant in colour as her personality and her use of multiple layers of subtle colours building to rich depth and dimension was superb.  
We were able to build our own composition and I have been very influenced by space, the moon, planets and stars this summer so mine materialised as a nod to the galaxy.
If you have ever thought about being a Powertex Tutor I would just say go for it, if you put the time and effort in to develop your artistic skills and your knowledge of the products who knows where you could go.  I'm so glad I did!

Keep Creating and share your makes with us over in The Powertex Studio or onPowertex Addicts.

Here's to the rest of 2018!
By for now
Fi xx

Monday, 2 July 2018

Upcycled

Welcome to my project to the June Make it Mixed Media Challenged Blog.  
This months challenge is UPCYCLE and for my project I have made a water pot from a coffee jar using Powertex and various bits and bobs left over from other projects as well as some totally beyond it old paintbrushes that were destined for the bin!


So here is what I started with: bits of hessian, t-shirt yarn, bandage/gauze, rope, left over Powertex fossils, canvas spacers and a coffee jar.  The only new part of this projects was some Powertex grey.

I snapped off the paintbrush handles so they finished just below the rim of the jar. I used the left over handles as spacers.
I poured some Powertex onto a leftover plastic plate...no more plastic ones in the house EVER!

First I dipped the gauze into the Powertex and worked it well in.  I wrapped it around the jar making wiggly wave type texture. I then worked Powertex into the hessian, rope and t-shirt yarn.  Next I coated Powertex on to the brushes, fossils and canvas spacers. I places the brushes onto of the gauze and wrapped hessian around the jar holding the brushes in place.
I continued to build up the jar with the various items and under the fossils I added some kitchen paper that I had worked Powertex into.  

To finish this stage I smeared Powertex over the neck of the jar, some of this will eventually wear off but it gives it texture and detail.  Set aside to dry - I worked outside in the sunshine and my was touch dry within half an hour max and fully dry in around 3 hours. 
Once it was dry I used some Easy Varnish and pigments in Ultramarine, Turquoise, red ochre and white.  I started with ultramarine over most of the jar and embellishments, then added turquoise and white. I used the white quite sparingly over the sails (canvas spacers) and the wiggly wavy area...you can see where I am going here can't you?
Finally I used red ochre and a muddy mix to add some colour to the fossils.

Can you spot the extra make in the bottom left image?

This was the jar lid.  I used the same pigments to colour the outside, finishing with some pearl pigment.  


So two makes all from the same jar!  The lid will be a tealight holder for the garden.

Have fun!

Bye for now, Fi xx


Thursday, 28 June 2018

Bister Mister Spray Tray

A crafter can never have too much storage and what is nicer than decorating your own?  I'm making quite a few bits at the moment in an effort to make my tiny weeny art space more colourful and more organised.  My latest piece is done with Powertex.
I made the kit up and then coated all over with Ivory Powertex.  I then added a texture paste, made up from Powetex and 3D flex. I roughly spread it over the two ends and in patches on the top of the storage caddy.  
On the longer sides I used Easy Structure to push through two of the artist quote stencils.  I then sprayed with blue bister and left to dry.
I also stencilled one side of the carry handle and on the other I roughly spread some of the 3D flex texture paste and pressed a plaster piece into it.
Once dry I washed back removing the surface bister and leaving a nicely stained base.  The bister had encouraged some great crackles on the ends and some nice fine ones on the top.
Next I used Acrylic inks from The Secret Art Loft to build up layers of colour and to bring out the crackles.

I used Aqua, Viola, Palm and Deep Sea which I applied randomly with a brush, wiping back with a wet wipe. This enabled me to build a colourful piece with a nice splodgy arty vibe.


Over the handle I added the colours and let them drip down, this gave a nice deep colour in the corners where the handle met the top of the tray.

Finally I mixed up some Bronze Colortricx with some Easy varnish and dry brushed the art quotes.

I also used some Secret Art Loft Blueberry Pie acrylic paint and dry brushed over the rough textures to add further depth.  
That's all for now
Fi xx


Monday, 21 May 2018

Mixed Up Blog Hop

I hope you are enjoying meeting the Mixed Up Design Team! Welcome to my blog.

As you know, each of us is sharing our favourite makes for Mixed Up today, and the project I’ve chosen to share with you is Deep Ice.

I created Deep Ice for the December 17/January 18 Magazine issue. I adore getting texture into whatever I create and this one is a very deeply textured and tactile piece made from Powertex and mediums created to work with it. 

It took a few days to create from start to finish just because you need to be patient and let the layers of 3D Flex texture paste dry out before you start adding colour. This was the base layer…

And this shows the build up of colour using pure powder pigments blended into Powerwax which is water based and archival quality..

I’m also showing a sneak peek of my Upcycled Powertex Japanese Journal that was published on Mixed Up Mag on Friday 18th May! You need to be a subscriber to view this step by step project.  
Mixed up Mag is such awesome value, not only do you get 3-4 step projects added per week, but there are downloadable pdfs for each project plus lots of other tips and tricks, how to's, interviews, product reviews and much more.The Mixed Up website has tons of mixed media projects, including these and many more!  If you want to know more pop on over to the website here
*
Make sure you visit everyone’s blog to be in with a chance of winning the Grand Prize! Here’s the hop list!

Mixed Up Magazine
Leslie Lineberry
Riikka Kovasin
Erica Evans
Debs Wainwright
Carol Fox
Corrie Herriman
Fiona Potter YOU ARE HERE
Mags Woodcock
Lisa Taggart
Nikki K
*
Hop Rules:
Visit each designer and leave a comment on their blog for a chance to win a fabulous mixed media prize
The draw is open interntionally
The draw closed 31st May at midnight GMT