I hope you are enjoying meeting the Mixed Up Design Team! Welcome to my blog.
As you know, each of us is sharing our favourite makes for Mixed Up today, and the project I’ve chosen to share with you is Deep Ice.
I created Deep Ice for the December 17/January 18 Magazine issue. I adore getting texture into whatever I create and this one is a very deeply textured and tactile piece made from Powertex and mediums created to work with it.
It took a few days to create from start to finish just because you need to be patient and let the layers of 3D Flex texture paste dry out before you start adding colour. This was the base layer…
And this shows the build up of colour using pure powder pigments blended into Powerwax which is water based and archival quality..
I’m also showing a sneak peek of my Upcycled Powertex Japanese Journal that was published on Mixed Up Mag on Friday 18th May! You need to be a subscriber to view this step by step project.
Mixed up Mag is such awesome value, not only do you get 3-4 step projects added per week, but there are downloadable pdfs for each project plus lots of other tips and tricks, how to's, interviews, product reviews and much more.The Mixed Up website has tons of mixed media projects, including these and many more! If you want to know more pop on over to the website here
*
Make sure you visit everyone’s blog to be in with a chance of winning the Grand Prize! Here’s the hop list!
Mixed Up Magazine
Leslie Lineberry
Riikka Kovasin
Erica Evans
Debs Wainwright
Carol Fox
Corrie Herriman
Fiona Potter YOU ARE HERE
Mags Woodcock
Lisa Taggart
Nikki K
*
Hop Rules:
Visit each designer and leave a comment on their blog for a chance to win a fabulous mixed media prize
The draw is open interntionally
The draw closed 31st May at midnight GMT
 Hi there, as I write this blog we are having the most glorious weather for the first May Bank holiday in the UK and it is fabulous! I'm listening to the Peaceful Guitar play list on Spotify and there's a lovely breeze wafting through the house....mmmmm... to top it all I love this kit!
Powertex has taken this one right back to basics to show how you can create some really super projects by using just the magic of Powertex, a nicely constructed kit and the basic pigment kit.
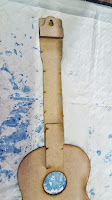
So first I joined the 2 main pieces together with Bronze Powertex and added the hanging bracket as show in the two images below.
 One the back was dry I used the textured paper to cover the front of the guitar, again using Bronze Powertex - there's no need to use any other mediums as the magic of Powertex covers so many uses.
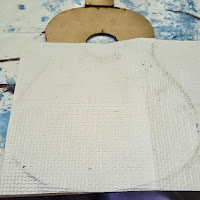
You can see how I made two pieces to cover the body if the Guitar. I also laid out the main design of my piece. The only parts of the kit I didn't use were the two paper flowers. I used more of the Bronze Powertex to stick the embellishments in place, the only thing I added was some jute string. Once everything was in place I left it to dry overnight.
Next I used PowerColor Pigments and Easy Varnish to build an Ombre shading moving through from Yellow Ochre to Red Ochre. I repeated this shading several times until I got the effect I was after.
To build the colour and shading I also added in some Titanium white in the latter layers.
I coloured the embellishments as well.
Once I was happy with the main colour I mixed up some silver Colortrix and cloured the strings.
I then added Burgundy PowerColor to the heart/flower embelishment and finally added some Rich Gold Colortrix to the centre of the two main embellishments and a faint brushing over the textured paper.
Below are some closeups to help you see the effects.
Hope you enjoy the Powertex Design Teams take on this project and we inspire you to have a go yourself. Don't forget to share your makes in the Powertex Studio on Facebook.
Happy Crafting
Fi


